
Geneviève Fortin, Staff Writer.
You are standing at the bathroom mirror with the wand halfway to your lashes, wondering why the mascara that looked so good on the influencer’s lashes turns yours into a clumpy, spidery mess by lunchtime. Or maybe you’re staring at a drawer with four half-used volumizing tubes, each abandoned after a week because the formula went dry, or flaked, or simply didn’t do what the label promised. If you’ve typed “why does my mascara clump” or “best way to apply volumizing mascara” into a search bar at 7 a.m., you already know the frustration.
Here’s a fact that surprises most people: volume in mascara comes almost entirely from the brush and the wet formula’s coating ability, not from any single miracle ingredient. A 2021 study in the International Journal of Cosmetic Science found that fibre-coating thickness and brush bristle spacing accounted for the majority of perceived lash-volume differences among tested formulas, more than the wax or polymer blend used. Understanding that changes how you shop, how you apply, and how you judge whether a product is actually working or just marketed well.
This guide walks through the mistakes that quietly sabotage volumizing mascara, from the way you wipe the wand to the angle you hold it, and gives you a way to tell real results from a good ad campaign.
- Most clumping is a wipe-and-wait problem, not a bad formula: excess product on the wand, applied too fast, is behind the majority of flaking and spidering complaints.
- Volume fades on its own timeline: lash cycles mean even a well-applied formula changes appearance by hour six, and that is normal, not a product failure.
- Brush shape matters more than ingredient lists: the physical geometry of the wand does more measurable work than most of the actives brands highlight on the box.
Why Your Mascara Clumps By Mid-morning
Clumping is almost never about a formula going bad in the tube. It is usually about timing and technique at the moment of application.
Think of the wand like a paint roller. Load it with too much paint and the first stroke on the wall looks fine, but by the third stroke you get drips and ridges. Mascara wands work the same way. A fresh dip from the tube carries more product than a single lash line needs, and if you apply it in one thick pass, the excess sits on top of the lash rather than coating it evenly.
The fix is almost embarrassingly simple: wipe the wand against the tube opening once, on both sides, before the first stroke. This removes the surface layer of product while leaving enough on the bristles to coat the lash. Then apply in two or three thin layers, letting each dry for about 20 to 30 seconds before the next.
A 2019 study in the Journal of Cosmetic Science measured that mascara applied in thin, dried layers held its shape and colour density longer over an eight-hour wear period than mascara applied in a single thick coat, with visibly less flaking reported by participants. The layering matters more than the brand.
Self-test: if your mascara clumps at the inner corner but not the outer lashes, you are likely pressing the wand too hard where lashes are shortest and most densely packed. Lighten your pressure there specifically rather than switching products.
Reading The Wand Before You Buy Anything
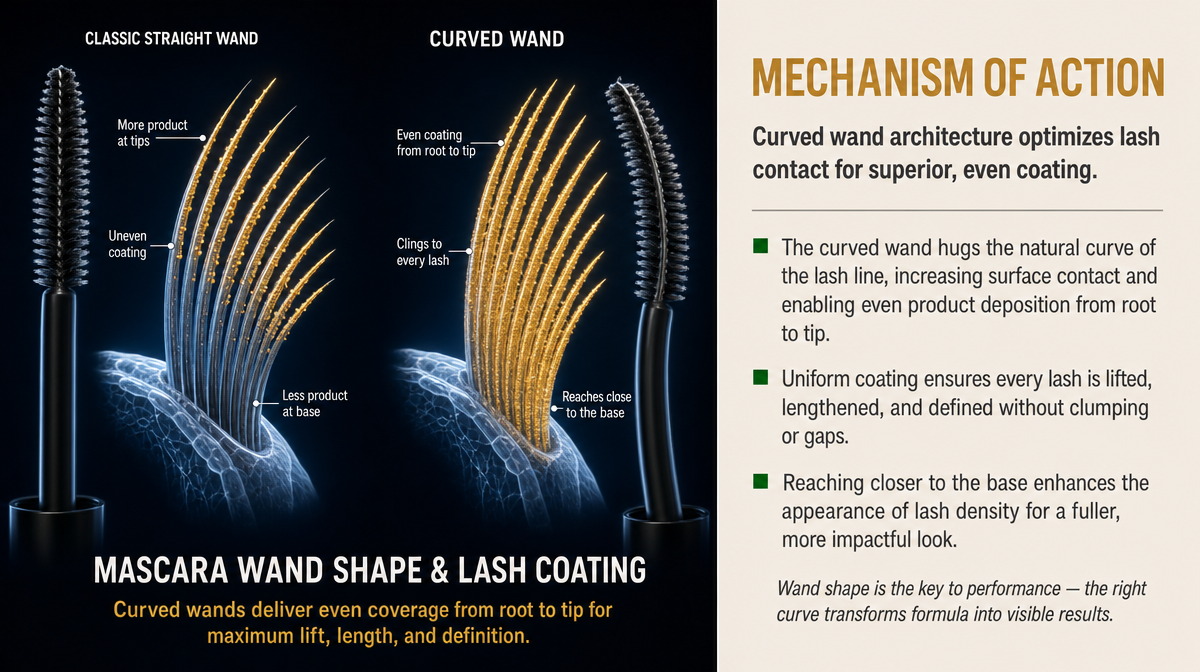
Packaging tends to sell you on the formula: fibres, polymers, a name like “volumizing complex.” But the wand shape is doing most of the physical work, and it is also the part you can actually assess before buying, if you know what to look for.
A tightly packed, tapered brush deposits more product at the base of the lash and less at the tip, which builds visible thickness without weighing lashes down into a spiky look. A looser, more spaced-out bristle pattern tends to separate lashes more than it builds them, which is a different goal (definition, not volume).
Household analogy: it is the difference between a stiff paintbrush loaded with thick paint and a soft-bristled brush loaded with thin paint. Both apply paint, but the coverage pattern is entirely different.
When you’re standing in the drugstore aisle, you can often see the brush through the box window. Look for a wand that narrows toward the tip and has bristles that appear dense rather than sparse. That geometry, more than any ingredient claim printed nearby, is a reasonable predictor of volumizing performance.
The Angle Mistake Almost Everyone Makes
Most people apply mascara by pulling the wand straight out from the lash line, parallel to the floor. This coats the middle of the lash reasonably well but misses the base, which is exactly where volume needs to start if you want lift as well as thickness.
A better method: tilt the wand so the tip touches the base of the lashes first, wiggle it gently side to side for a second or two (this deposits product between individual lashes, not just on the surface), then pull upward and outward in one motion. The wiggle is the part people skip, and it’s the part that actually builds volume at the root.
This takes about 15 extra seconds per eye. It is not glamorous advice, but it addresses the single biggest technique gap between how most people apply mascara and how it looks fullest.
Mistake to watch for: applying only to the top of the lash because it’s faster and less likely to poke your eye. Understandable, but it produces coated tips and bare roots, which reads as “long” rather than “full.”
What Realistic Volume Actually Looks Like, And How Long It Lasts
Marketing images are often shot with false lashes layered under mascara, or heavily retouched. It helps to reset expectations around what a well-applied volumizing formula can realistically do on natural lashes.
Expect a visible increase in apparent lash thickness, typically noticeable within the first application, with the fullest look in the first one to two hours after application while the formula is still slightly flexible. By hour six to eight, most formulas settle and lashes may look slightly less voluminous as the coating fully sets and natural oils from the eye area interact with it. This is a normal formula behaviour, not a sign of failure, and individual results vary depending on lash density and length to begin with.
A 2020 consumer-perception survey published in Cosmetics reported that most participants judged mascara performance primarily in the first two hours of wear, which may explain why so many formulas are optimized to look their best early rather than at hour ten.
How to judge fairly: check your lashes at three points, right after application, at the four-hour mark, and at the end of the day, ideally in the same lighting each time (daylight near a window is most consistent). If thickness holds reasonably well through the four-hour check, the formula is doing its job. Some late-day settling is expected and not a defect.
Where Cheap And Expensive Formulas Actually Differ
It’s tempting to assume a higher price means better volumizing performance, but the real differences tend to show up in wear behaviour rather than initial application.
Lower-cost formulas sometimes use waxes that stay slightly tacky rather than fully setting, which can transfer to the under-eye area or smudge with humidity. Higher-cost formulas more often use polymer blends that set to a drier finish, reducing transfer, though this isn’t universal and some premium products still smudge.
Another real difference is fibre or particle size consistency. A 2018 formulation study in the International Journal of Cosmetic Science found that inconsistent fibre length within a single formula batch was associated with more visible clumping, and that this inconsistency correlated more with a manufacturer’s quality control process than with price point specifically. In other words, a mid-priced formula from a manufacturer with tight quality control can outperform an expensive one with looser standards, and there’s no way to know this from the box.
What this means practically: price is a weak signal on its own. A patch test on the back of your hand, checking whether the formula dries to a smooth, non-tacky finish within about 60 seconds, tells you more than the price tag does.
Removing It Properly, So The Next Application Actually Works
A mistake that compounds over weeks: rubbing at mascara residue instead of dissolving it. Rubbing pulls at the lash follicle and can cause lashes to shed prematurely, which then makes future applications look sparser, prompting a switch to yet another “volumizing” product when the real issue is lash loss from removal habits.
The Canadian Dermatology Association’s general public guidance on eye-area skincare recommends using a gentle, oil-based or micellar remover and holding a soaked cotton pad against closed lids for several seconds before wiping, rather than scrubbing immediately. This softens the formula so it lifts away rather than needing to be dragged off.
Household analogy: it’s the same reason you soak a baked-on pan before scrubbing it. Force removes stuck-on residue at a cost, patience removes it without damage.
Self-test: if you’re finding stray lashes on your cheek or pillow more than once or twice a week, your removal method, not your mascara, is likely the culprit. Switch to a soak-and-lift method for two weeks before blaming the formula.
The Marketing Language Worth Ignoring
Terms like “buildable,” “fibre technology,” and “lash-lifting complex” describe real mechanisms sometimes, but they are also unregulated marketing language that any brand can print regardless of formula quality.
“Buildable” simply means the formula doesn’t clump badly when layered, which is a basic performance expectation, not a premium feature. “Fibre technology” can mean genuine tiny rayon or nylon fibres that add length and bulk, or it can mean nothing measurable at all. There’s no regulatory requirement to disclose fibre presence or concentration on Canadian cosmetic labels beyond the general ingredient list.
What’s worth checking instead is the ingredient list itself: fibres will usually appear as “rayon,” “nylon-6,” or similar terms partway down the list. Their position on the list gives a rough sense of concentration, since ingredients are listed in descending order by weight for concentrations above 1 percent.
FASHION Magazine and The Kit have both run reader-facing explainers in recent years breaking down mascara ingredient lists in plain language, which is a useful habit to build if you want to shop past the marketing copy on the box.
Storing And Timing Your Mascara So It Performs Consistently

Mascara dries out from repeated exposure to air, not from age alone sitting unopened. Every time you pump the wand in and out of the tube, you push air in, which speeds up drying and can also introduce bacteria.
The fix is to twist the wand gently while withdrawing it rather than pumping. This coats the wand evenly without forcing extra air into the tube. It sounds trivial, but it meaningfully extends how long a formula stays at its intended consistency.
Most cosmetic chemists and dermatology sources, including general guidance echoed by Canadian Living’s beauty desk, suggest replacing mascara roughly every three months, both for hygiene and because the formula’s texture changes measurably as it dries, becoming clumpier and less able to coat lashes evenly regardless of technique.
Self-test: if your mascara has become noticeably harder to apply smoothly over the past few weeks despite no change in your technique, check the date you opened it. If it’s past the three-month mark, the formula itself has likely changed, and no application trick will fully fix that.
Key Takeaways
Volume comes mostly from the wand and the wet coating technique, not a single star ingredient. Wipe the wand before applying, layer in thin coats, and tilt into the lash base with a slight wiggle before pulling outward. Expect some natural settling by the end of the day, that is not a failed product. Judge formulas by how they wear at the four-hour mark, not by how they photograph in the first ten minutes. Replace mascara roughly every three months and switch from pumping to twisting the wand to slow drying between uses.
A Quick Checklist Before Your Next Application
- Wipe the wand on both sides before the first stroke
- Apply in two to three thin layers, drying briefly between each
- Tilt the wand into the lash base and wiggle before pulling outward
- Check performance at the four-hour mark in consistent light, not just right after application
- Remove with a soak-and-lift method rather than rubbing
- Twist the wand out of the tube rather than pumping
- Replace the tube roughly every three months
This article is general information and does not replace advice from a dermatologist or eye-care professional.
Individual results vary depending on lash type, technique, and formula, and your experience may differ from the studies cited here.