
Dr. Priya Nandakumar, Senior Health and Science Editor.
There is a drawer, or a shelf, or a makeup bag with a broken zipper, and inside it are at least four eyeshadow palettes that seemed essential at the time. Most of them get used for the same two shades, over and over, while the rest of the pan sits untouched under a thin layer of dust. The question that actually gets typed into a phone at eleven at night is not “which palette should I buy next.” It is closer to: why does my eye makeup look flat by 10 a.m., or muddy no matter what I do, or fine in the mirror at home and different in daylight outside.
The surprising part is how little of that comes down to the palette itself. A 2021 study in the International Journal of Cosmetic Science measuring pigment transfer found that application technique, not formula alone, accounted for the majority of the perceived colour intensity difference between two people using an identical shadow. In plain terms: the product in your hand right now is very likely capable of a better result than you are currently getting from it. This piece is about the technique side of that equation.
- Undertone matching beats shade-matching. A shadow that flatters your eye colour on a chart can still look wrong if it fights your skin’s undertone rather than your eye’s.
- Most “muddy crease” complaints are a blending order problem, not a pigment problem. The sequence you apply shades in matters more than how many shades you own.
- Fallout is a mechanical issue, not a bad-luck issue. A few seconds of prep before you touch a shimmer shadow will change how much of it ends up on your cheek.
Finding Your Undertone In Daylight

Bathroom lighting is almost always warm and dim, which is why a shadow that looked golden and flattering at home can look sallow and off the second you step outside. Daylight is the closest thing to a neutral reference we have without a lab, which is one reason dermatologists and colour consultants alike suggest checking makeup near a window rather than under a vanity bulb.
The simplest self-test: apply your usual shadow, then look at your eyes in a mirror positioned near natural light, ideally within the first hour after sunrise or a couple of hours before sunset when the light is softer and less directional. If the shadow reads slightly grey or chalky, you are likely applying a cool-leaning shade against warmer undertones, or vice versa. This is not about your skin’s depth of colour, which is a separate axis entirely. Two people with very different skin tones can share the same undertone, and the same shadow can behave differently on each of them depending on that undertone, not their depth.
A household comparison that tends to land: think of undertone like the white balance setting on a camera. The same object photographed under “warm” versus “cool” white balance looks like it changed colour, even though nothing about the object did. Your skin is doing something similar to the shadow sitting on top of it.
Why Your Crease Keeps Looking Muddy
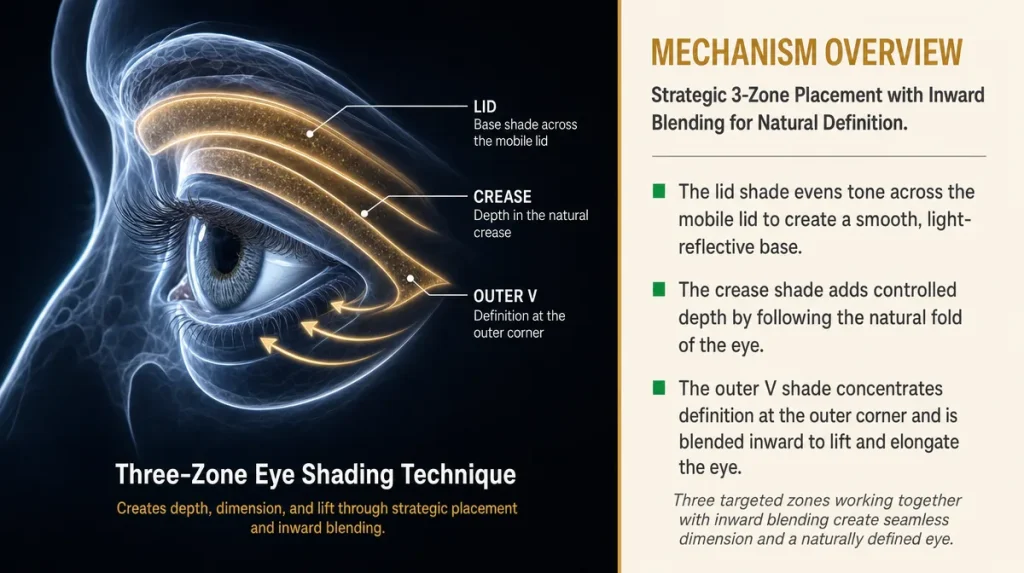
Muddiness is almost always an order-of-operations problem. When two mid-tone shades are blended into each other before either one has a defined edge, the brush drags both pigments into the same zone and the eye reads the result as a grey-brown smear rather than two distinct tones.
The fix is sequencing, not new products. Apply your lightest transition shade first, across the whole lid and up into the crease, and blend it out fully before anything else touches the eye. Only once that base is soft and even should a deeper shade go into the crease itself, placed with small windshield-wiper motions concentrated in the outer corner first. Build intensity in that outer corner before bringing any colour toward the inner corner, where skin is thinner and pigment shows up faster than expected.
A common mistake is loading the brush heavily on the first pass. Two light passes, blended each time, produce a cleaner gradient than one heavy pass followed by frantic blending after the fact. Once shadow has clumped into the crease, blending mostly just moves the mud around rather than lifting it out. If a look starts to feel muddy, a clean, dry blending brush run gently along the crease before adding anything else often does more good than another shade.
The Brush Is Doing More Work Than The Pigment
A dense, tightly packed brush deposits colour and holds its shape; a soft, fluffy brush diffuses colour and blurs edges. Using the wrong one for the job is one of the most common reasons a palette feels like it “doesn’t perform” when the issue is really tool mismatch.
For packing colour onto the lid or building intensity in the crease, a flat, firm, small brush works best, applied with a patting or pressing motion rather than a sweeping one. Sweeping a firm brush across the lid tends to move less pigment and can drag the shadow unevenly. For blending edges once colour is placed, switch to a larger, softer brush and use light circular motions, keeping the brush mostly clean between the packing step and the blending step.
A kitchen analogy that tends to stick: a firm brush is a spatula, meant to place and press; a soft brush is a whisk, meant to work air and softness into something that is already there. Using a whisk to spread frosting evenly, or a spatula to whip cream, will technically move product around, but neither does its job well. The same mismatch happens constantly with eyeshadow brushes, and switching tools for each step, rather than trying to make one brush do everything, is often the single biggest visible upgrade available without spending anything.
Building A Soft Transition Without Buying A New Brush
The “transition shade” is the light, slightly warm neutral that fills the space between the lid colour and the brow bone, and it is the piece most amateur applications skip, which is why store-bought looks often appear to have a soft gradient that home attempts lack.
If a dedicated transition shade is not on hand, most palettes contain something close enough: a pale matte in the same warm or cool family as the rest of the palette, one or two steps lighter than the crease colour. Apply it across the entire eyelid up to just below the brow, using a slightly larger fluffy brush than usual, and blend in soft back-and-forth motions until there is no visible line where the shadow stops.
The mistake most people make here is skipping this step entirely and going straight from bare lid to a deep crease shade, which creates a hard, disconnected patch of colour rather than a gradient. The other common mistake is choosing a transition shade that is too dark, which defeats the purpose since it no longer reads as a soft in-between tone. As a rough guide, if the transition shade looks like it could pass as a subtle all-over wash of colour on its own, it is doing its job. If it looks like a crease shade in its own right, it is too strong for this step.
Making Shimmer Stick Instead Of Fall
Fallout, the fine dust of shimmer that lands under the eye, is largely a static and adhesion problem rather than a sign of a poor-quality shadow. Loose pigment particles cling weakly to dry skin and to each other, and gravity does the rest once the brush lifts away.
A damp brush changes that. Lightly misting a flat brush with a setting spray, or pressing it against the back of a clean hand after a spritz so it is damp rather than wet, allows shimmer pigment to bind to the brush and then to the lid, applying more like a thin paint than a loose powder. This tends to intensify colour payoff as well, since compressed pigment reads more richly once wet.
A second, simpler habit: apply all matte shadow first, then tap any excess loose powder off the brush before touching shimmer, and do eye makeup before foundation and concealer whenever the routine allows it, so any fallout can be wiped away before base makeup goes on. Holding a folded tissue or a clean makeup wipe just under the lash line while applying shimmer catches most fallout before it lands. None of this requires a different palette. It requires roughly fifteen extra seconds of setup.
Layering Matte And Shimmer Without The Eye Looking Busy
An eye can read as “put together” or “overdone” depending almost entirely on where the shimmer sits relative to the matte shading, not on how much shimmer is used.
A reliable structure: matte shading defines shape, shimmer defines light. Keep shimmer to the areas that naturally catch light, the centre of the lid and the inner corner, and let matte shades handle the crease, outer corner, and any deepening. Placing shimmer in the crease, where shadow naturally falls, tends to look heavy and can emphasize texture rather than smooth it. Placing matte shading on the centre of the lid, where the eye naturally curves toward the light, tends to look flat.
A quick check before leaving the mirror: close one eye and look at where the brightest point sits. If it lands on the centre of the lid, the shimmer is placed well. If the brightest point is in the crease or near the brow bone, the shimmer has likely drifted or was placed too high, and a small dry brush swept over that area to soften the edge usually fixes it in seconds.
What Actually Matters Versus What Is Marketing
Pan size, packaging weight, and the number of shades in a palette say very little about how a shadow will wear over eight hours. What tends to matter more, based on formulation reporting covered by beauty trade press, is pigment load and binder quality, meaning how much colour is actually packed into the powder versus filler, and how well that powder is compressed to resist crumbling on application.
A rough at-home check: swipe a finger across the pan. If a large amount of loose powder comes away with almost no pressure, the pigment is likely under-bound and may wear less evenly and fall out more during application, regardless of price point or brand reputation. If the shadow requires a bit of pressure to pick up colour but deposits richly once it does, the compression is doing its job.
Longevity through the day comes down largely to what sits underneath the shadow, not the shadow itself. A thin layer of eye primer, or in its absence a small amount of translucent setting powder pressed into the lid before shadow goes on, gives pigment something to grip and reduces the creasing that happens when shadow sits directly on the natural oils of the eyelid. Consumer guidance from Canadian household magazines has long pointed to primer, more than any single shadow formula, as the variable most responsible for wear time.
Key Takeaways
Most eyeshadow disappointment traces back to five fixable habits rather than the product itself: checking colour in daylight rather than warm bathroom light, applying shades in the right order, matching brush shape to the step at hand, using a transition shade to build a gradient, and prepping shimmer so it adheres instead of scattering. None of these require a new palette.
A Quick Checklist Before Your Next Application
- Check undertone and finished colour near a window, not under warm bathroom light
- Apply a light transition shade across the whole lid before any deeper colour
- Use a firm, flat brush to pack colour and a soft, fluffy brush to blend it
- Build crease depth from the outer corner inward, not the inner corner outward
- Dampen the brush slightly before applying shimmer to reduce fallout
- Keep shimmer on the lid centre and inner corner; keep matte shading in the crease
- Apply a thin layer of primer or a touch of setting powder before shadow for longer wear
This article is general information and does not replace personalized advice from a makeup professional or dermatologist.
Individual results vary depending on skin type, eye shape, and product formulation.